
If you want to get into Packet or APRS but don’t want to spend a lot of money, at under $30, the NinoTNC may be right for you. It is the most inexpensive TNC I have found to date.
Purchase
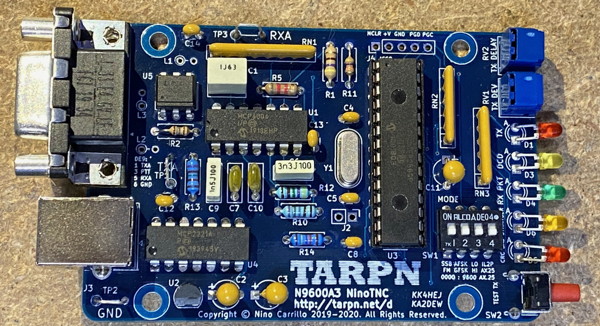
Order the circuit board and microprocessor (and a case if you’d like) from TARPN’s Etsy page. Then, download the bill of materials (BOM) from TARPN. Finally, Order the individual parts from Digikey. Instructions for uploading the BOM to Digikey are on TARPN’s site. Note that all this costs under $30 before shipping.
Assemble
Solder the parts to the board by following the instructions – be sure to use the correct instructions since there are multiple revisions of the board.
Connect your Radio
After assembling, connect it to your radio. NinoTNC has a DB9 connector for this purpose. To make things easy, the pinout even matches the TinyTrak4 and other TNCs. If you do not want to build a cable, you can make one. Two sources of cables I’ve used are MRE Direct on eBay (for Motorola radios) and Byonics (for ham radios). Before ordering a cable, be sure the pinout matches the NinoTNC and your radio! I cannot be responsible for damage caused by incorrect cables!
Connect your Computer
Finally, connect it to your computer using a USB-A to USB-B cable. This cable should work fine. With modern operating systems, there is no need to install any special drivers for this to work as the board contains a standard USB-serial interface.
Download Software
Once connected to your computer, you can then download any number of packet or APRS-capable applications. Here are a couple of applications to get you started:
Enjoy!
And that’s it! You now have an inexpensive TNC that works just as well (in my experience) as the more expensive models.
I mostly use packet TNCs for APRS, although I have dabbled with packet Winlink and BBSs lately.
More information including assembly instructions and a mailing list can be found on TARPN’s info page.